Ever walked into a living room and found your favorite couch turned into a shredded canvas? You know that moment when you realize your cat has claimed every vertical surface as its personal gym.
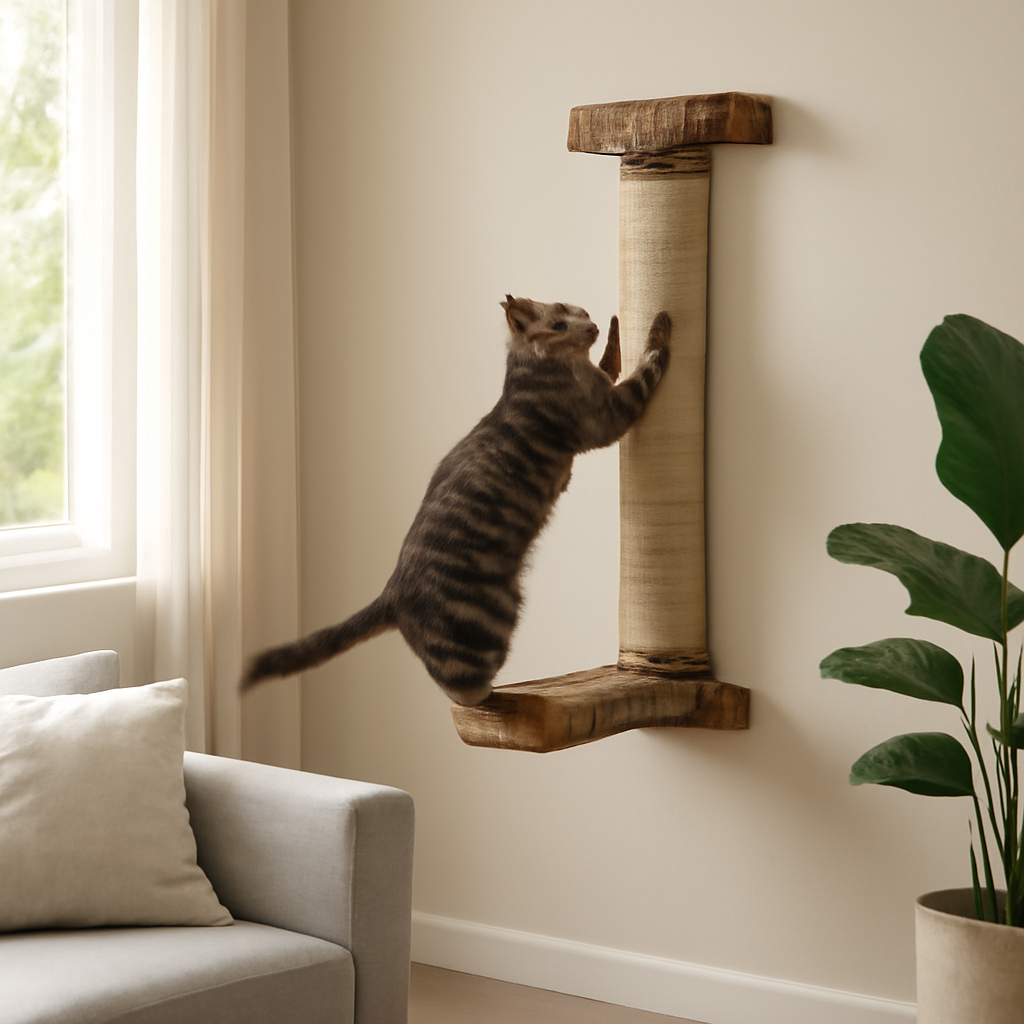
We’ve all been there – the frustration of torn fabric, the guilt of scolding a creature that’s just following its instincts. That’s why a cat scratching post wall mounted can feel like a lifesaver, turning blank walls into happy, healthy playgrounds.
Think about it this way: cats need to scratch to stretch their muscles, mark territory, and keep their claws sharp. When we give them a sturdy, wall‑mounted option, we’re not only saving our furniture, we’re giving them a dedicated space that feels natural and safe.
In our experience at Kaotik kollectionz, we’ve seen active indoor cats instantly gravitate toward a well‑placed post, especially when it’s positioned near a sunny window or their favorite perch. It’s kind of amazing how a simple installation can change the whole vibe of a room.
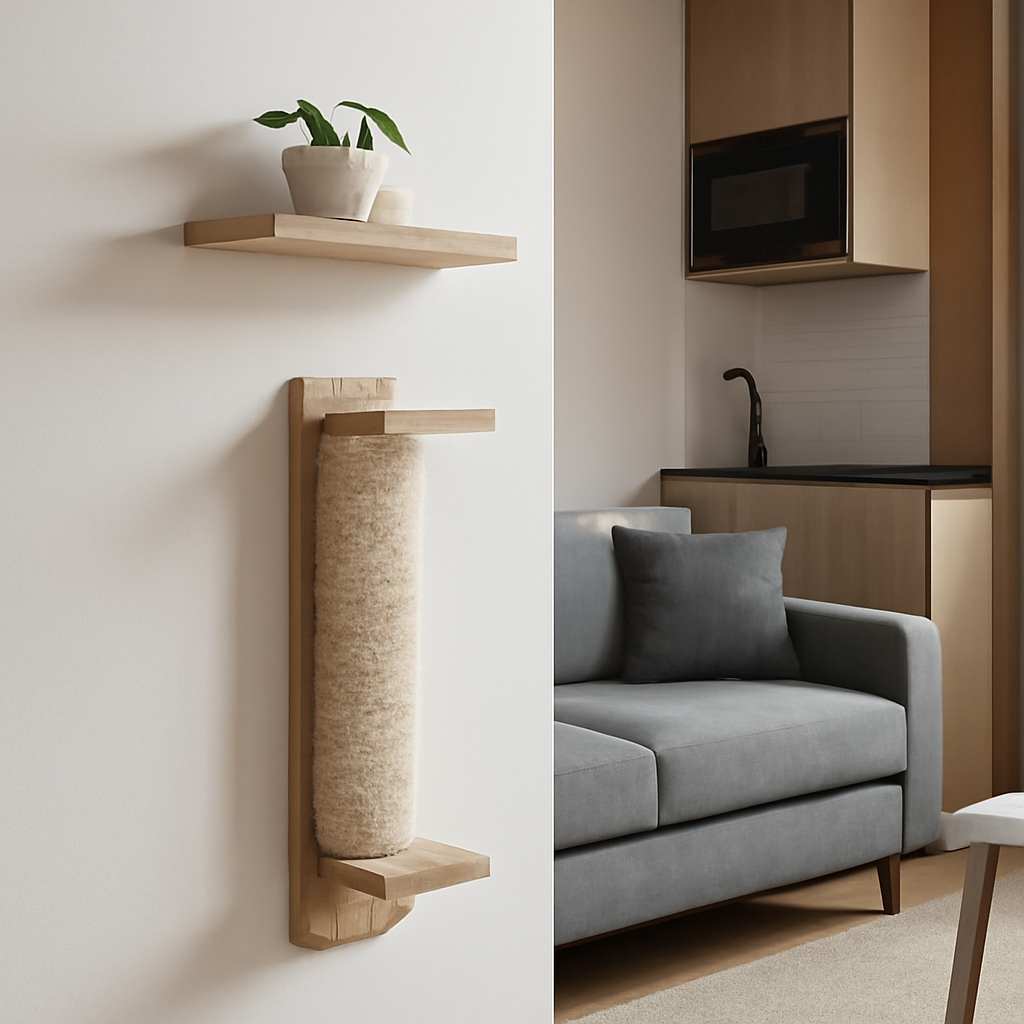
But choosing the right wall‑mounted post isn’t just about looks. You’ll want a base that can hold the weight of a vigorous climber, a scratching surface that mimics tree bark, and a height that lets them fully extend their bodies.
Here’s a quick mental checklist: solid mounting hardware, durable material (like sisal or natural wood), and a design that blends with your décor without looking like a cat‑themed billboard.
And don’t forget the placement. A spot near a doorway or where your cat watches the outside world can double as a visual perch, satisfying both their curiosity and their need to stretch.
So, if you’re tired of shredded cushions and silent apologies, consider swapping that frustration for a sleek, wall‑mounted scratching post. It’s a small change that makes a big difference for both you and your feline friend.
Ready to give your walls a purpose and your cat a happy outlet? Let’s dive into the details and find the perfect wall‑mounted solution for your home.
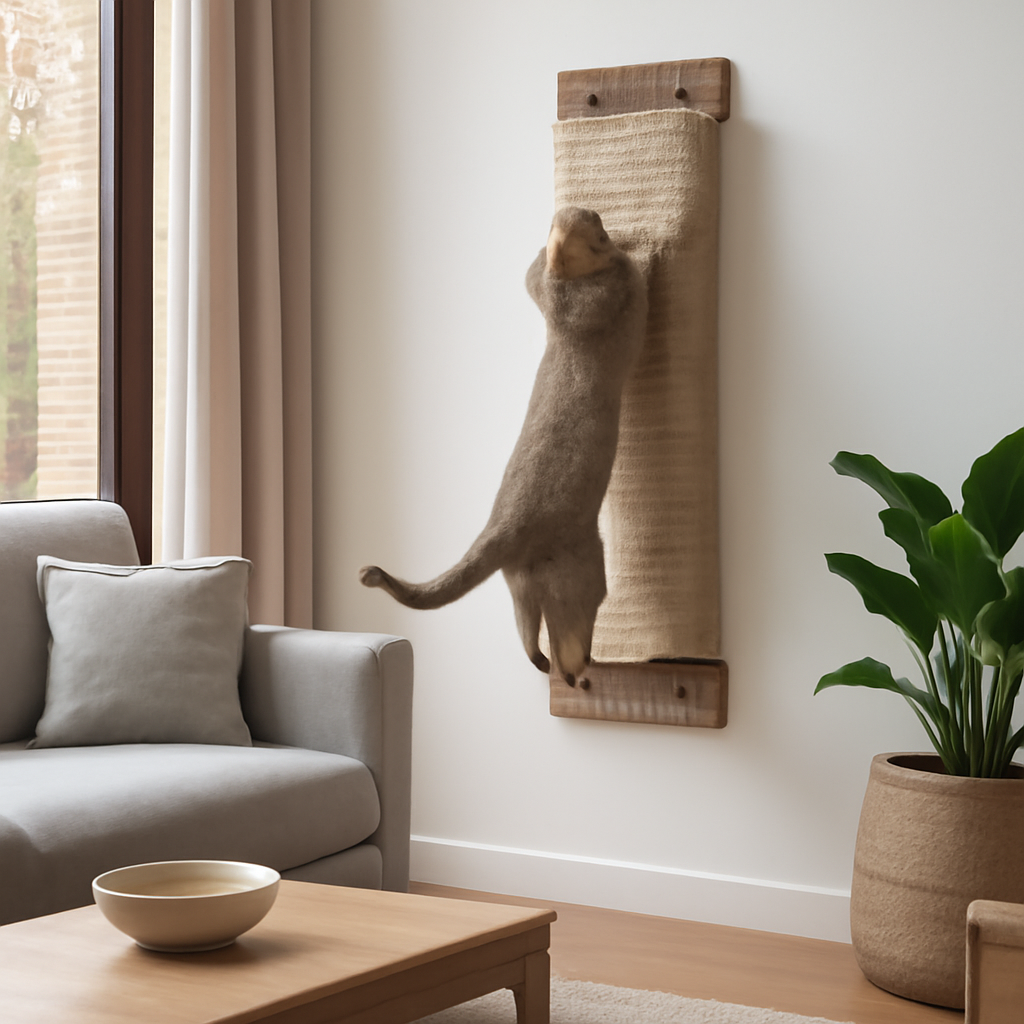
If you’re fed up with shredded cushions, a cat scratching post wall mounted gives your feline a sturdy, vertical outlet that protects your furniture and satisfies natural instincts. Choose a durable material, secure mounting hardware, and place it near a sunny perch or doorway, and you’ll see your cat stretch, scratch, and chill – all while your home stays intact.
When you’re hunting for the perfect wall‑mounted cat scratching post, the material matters almost as much as the placement. A good surface feels satisfying to your cat’s claws, stands up to years of scratching, and blends with your décor without screaming “pet store.” Below are the six most cat‑approved options we keep seeing in our own Kaotik kollectionz catalog.
Sisal is the classic. It’s natural, gritty enough to give cats that “ahh” when they dig in, yet soft enough not to shred your walls. Most wall‑mounted posts wrap sisal around a sturdy wooden core, so the post stays firm even when a heavy‑built tom goes full tiger.
Pro tip: look for tightly‑woven sisal – loose strands tend to fray quickly and turn into a messy carpet of fibers.
Nothing beats the feel of real bark. It mimics the trees cats would climb outdoors, offering a textured surface that engages their instinct to claw and stretch. Cedar and pine are popular because they’re lightweight yet strong, and they have a pleasant scent that many cats love.
If you’re worried about splinters, sand the bark lightly and finish it with a non‑toxic sealant. You can even paint the sealant with a pet‑safe, cruelty‑free colour from RedInk Cosmetics for a pop of style that doesn’t compromise safety.
For a more polished look, low‑pile carpet tiles work well. They’re easy to replace if a cat decides to turn the post into a chew toy. Choose a tufted, low‑pile option that resists snagging – the smoother the surface, the less likely it is to pull fibers.
And here’s a little hack: you can customise those carpet squares with a printed design from JiffyPrintOnline. A fun pattern that matches your living‑room rug can turn a functional post into a design statement.
Seagrass offers a natural, eco‑friendly alternative to sisal. It’s slightly softer, which can be great for older cats or kittens with delicate claws. The woven texture still provides enough resistance to keep claws sharp.
Just make sure the wicker is tightly bound to the mounting board; loose strands can become a choking hazard.
Microfiber mimics the plush feel of a soft fabric while offering durability. Some newer posts use a microfiber‑covered foam core that compresses under pressure, giving a satisfying give‑and‑take feel. It’s also easy to wipe clean – a quick damp cloth removes dust and hair.
Keep an eye on the stitching; strong seams prevent the fabric from tearing after repeated use.
Believe it or not, heavy‑duty recycled cardboard can be a surprisingly sturdy scratching surface. When laminated and mounted on a metal bracket, it holds up well and is completely biodegradable. This is a budget‑friendly choice for cat owners who love sustainable products.
Because cardboard can absorb moisture, seal the edges with a water‑based, non‑toxic coating if you live in a humid climate.
Choosing the right material often comes down to your cat’s preference and the aesthetic of the room. In our experience, a mix of natural textures – like sisal wrapped around a bark base – satisfies the majority of felines while looking sleek on any wall.
Still undecided? Our 10 Essential Cat Scratching Post Tall Choices for Active Cats guide breaks down which combos work best for different activity levels.
Ready to see one in action? Check out the quick demo below – it shows how the post holds up when a cat leaps, stretches, and claws all at once.
After watching, picture this: a sleek post, a happy cat, and a wall that stays pristine. It’s the kind of win‑win that makes both pet parents and interior designers smile.

Before you hand the post to your cat, make sure the wall is ready. A shaky mount turns a fun playground into a safety hazard, and trust me, you don’t want a feline‑sized wreckage on your living‑room wall.
Most walls in Australian homes are built on 2×4 studs spaced about 16 inches apart. Grab a stud‑finder (or tap the wall – a solid thud usually means a stud) and mark the centre of two studs where you’ll attach the brackets.
Real‑world example: A pet parent in Sydney discovered their post wobbled because they anchored into drywall only. Once they re‑screwed into the studs, the cat instantly claimed the spot and the couch stayed intact.
Look for heavy‑duty, cold‑rolled steel brackets that are rated for at least 70 lb per post – that’s the figure quoted by a leading cat‑furniture brand for their floating scratching post.
We’ve linked to a floating cat scratching post that uses exactly that kind of bracket. If you’re using a lighter post, the same hardware is still overkill in a good way – it gives you peace of mind.
Measure your cat’s fully stretched length (front‑to‑back) and add a couple of inches. Most adult cats need 30‑35 inches of vertical space to stretch comfortably.
Use a bubble level on the brackets before you drive the screws home. A quick level check prevents you from ending up with a crooked post that looks like a leaning tower of Pisa.
If you’re on drywall, #8 wood screws of at least 2 inches will do the trick when they go straight into the stud. For brick or concrete, swap to masonry anchors and a hammer drill – the same 70 lb rating applies, but you’ll need a bigger hole.
One London cat‑owner shared that they used plastic wall plugs for a plasterboard wall, only to see the post sag after a few weeks. Switching to metal anchors solved the problem instantly.
After the brackets are tight, give the post a firm pull – about 20 lb of pressure is a realistic test for a 10‑lb cat that likes to leap. If the post holds steady, you’re golden. If it wiggles, double‑check the screw depth or add a second set of brackets.
Think of it like a mini‑stress test: you’re protecting both your feline and your wall.
When you’re moving house, you’ll want to take the post with you or leave a clean wall behind. Leave a small foam pad behind each bracket – it protects paint and makes removal a matter of unscrewing two #8 screws. You’ll end up with just a couple of ⅛‑inch holes that any DIY‑er can patch with spackle.
In fact, the same floating post we linked earlier boasts a foam‑backed bracket that leaves minimal wall damage. It’s a small detail that makes a big difference for renters.
So, grab your stud‑finder, pick sturdy brackets, and give those screws a confident turn. Your cat will thank you with endless stretches, and your walls will stay looking sharp for years to come.
Alright, you’ve nailed the studs and you’ve got the brackets ready – now it’s time to pick the actual post that will survive your cat’s daily gymnastics. You probably wonder, “Which wall‑mounted scratching post actually lasts?” Let’s walk through the top contenders, the quirks that set them apart, and a quick‑look table so you can decide in a coffee break.
Ruby Road goes for a sleek, low‑profile design that blends into modern décor. It’s wrapped in natural sisal with a multidirectional weave, so your cat can scratch in any direction without fighting the fibers. The mounting hardware is a set of stainless‑steel brackets rated for 70 lb, which is more than enough for a 12‑lb jumper.
What I love about Ruby Road is the optional anti‑slip pads – they keep the base steady if your cat decides to use it as a perch. For renters, the brackets leave just two tiny screw holes, making removal a breeze.
If you’re watching the wallet but still want a sturdy option, Frisco’s Double‑Wide is hard to beat. It’s essentially two 24‑inch sisal panels side‑by‑side, giving extra surface area for a cat that likes to alternate paws.
The post ships with pre‑drilled holes that line up with standard stud spacing, so you don’t have to measure twice. It’s rated for 55 lb – plenty for most indoor cats, though I’d add a second bracket if you have a larger breed.
This one feels a bit like a piece of art. The floating post uses a hollow wood core wrapped in sisal, then hangs from hidden brackets that keep the wall clean. The “floating” effect lets you adjust the height in 2‑inch increments, perfect for a growing kitten or a senior cat that prefers a lower reach.
Because the brackets are concealed, the visual clutter is minimal – great for a living‑room that already has a lot of personality. The hardware is rated at 80 lb, so even a big Maine Coon can stretch without wobbling.
So, how do you choose? Think about three things: the material your cat prefers, the space you have on the wall, and how much you want to spend. Most cat lovers I talk to say the material wins – sisal is a safe bet, but some senior cats adore the softer feel of cork.
And remember, a post that looks good but wobbles won’t keep your cat interested for long. The mounting system is the silent hero here – heavy‑duty steel, proper studs, and a little foam pad can turn a cheap post into a lifelong favourite.
Here’s a quick snapshot to help you compare the specs at a glance:
| Brand | Material | Height | Mounting System | Price Range (AU$) |
|---|---|---|---|---|
| Ruby Road | Natural sisal (multidirectional weave) | 30‑35 in | Stainless‑steel brackets, 70 lb rating | 75‑95 |
| Frisco Double‑Wide | Sisal panels (double width) | 24‑in | Pre‑drilled holes, 55 lb rating | 45‑60 |
| Catastrophic Reations Floating | Wood core + sisal wrap | 30‑40 in (adjustable) | Hidden brackets, 80 lb rating | 120‑150 |
Notice how the floating post costs more but offers height adjustability and a cleaner look. If you’re a design‑minded pet parent, that trade‑off might be worth it. If you’re more about raw durability, Ruby Road’s stainless brackets are hard to beat.
One tip that trips up a lot of DIYers: after you tighten the screws, give the post a gentle pull – about 20 lb of force. If it holds steady, you’ve done it right. If it wiggles, add a second set of brackets or use a longer screw to reach deeper into the stud.
And here’s a little research‑backed nugget: according to Cats.com, providing multiple scratching options, including a vertical wall‑mounted post, dramatically reduces furniture damage. It’s not just about aesthetics; it’s a real behavioural fix.
Bottom line: pick a brand that matches your cat’s texture preference, fits your wall space, and stays within your budget. Then double‑check the mounting hardware, give it a load‑test, and watch your feline turn that blank wall into a happy playground.
Living in a studio or a one‑bedroom can feel like a game of Tetris, especially when you add a cat who thinks every vertical surface is a playground.
That’s why we’ve rounded up four space‑saving designs that let you keep the walls useful for your feline without sacrificing precious floor real‑estate.
Imagine a floating bookshelf that doubles as a scratching post. You mount a sturdy wood shelf at cat‑height, wrap the back edge in sisal, and voilà – a perch, a storage spot for a few décor items, and a place for claws to sink.
We’ve seen Sydney renters pair a three‑tier walnut shelf with a 2‑inch sisal strip; the cat gets a climb and the owner gets extra space for books. Because the shelf is anchored to studs, it stays rock‑solid, and the sisal can be swapped out when it starts to fray.
Corners are often wasted, but a hinged post that folds flat against the wall when not in use can turn that dead angle into a secret cat gym.
One of our Melbourne customers installed a 30‑inch hinged post that tucks behind a slim cabinet door. When the cat wants to stretch, you simply swing it open – no permanent protrusion, no tripping hazard.
When you fold it back, the wall looks clean, and you still have the studs to secure the hinge.
If you already have a kitchen or bathroom cabinet that’s rarely used, consider swapping a drawer for a narrow cat‑height insert wrapped in carpet‑tile or sisal. Pull it out, let the cat stretch, then slide it back and hide the hardware.
The trick is to keep the insert under 4 inches wide so it doesn’t interfere with your pots or towels. A simple #8 screw into the side wall keeps it steady, and the cat gets a private nook that’s out of sight when guests arrive.
Mirrors are a staple in small apartments because they make rooms feel larger. Mount a thin, full‑length mirror on the wall, then attach a narrow sisal strip to the bottom edge. The cat thinks it’s just another reflective surface, but it’s actually a discreet scratching zone.
Because the mirror covers the hardware, you avoid the “bracket eyesore” look. It’s especially handy in a hallway where you need a quick visual cue for your cat without cluttering the space.
So, what’s the next step? Grab a stud‑finder, pick the design that matches your layout, and give the post a quick pull‑test before your cat discovers it. A solid mount, a replaceable scratching surface, and a little creative thinking are all you need to turn a tiny apartment into a cat‑friendly haven without losing any square metres.
DIY usually starts with a few dollars for wood, sisal rope, and some brackets. You can keep the total under A$50 if you already have a drill. Ready‑made models from boutique brands often start around A$80 and can climb past A$150 for premium finishes.
So, does a tighter budget automatically mean a DIY win? Not always – you might end up buying extra hardware to make the mount safe, which can eat into those savings.
When you build it yourself, you decide everything: the height, the colour, even a hidden pocket for treats. Imagine wrapping reclaimed barn wood in natural sisal, then painting the back a soft teal that matches your couch.
Ready‑made posts give you a polished look right out of the box, but you’re limited to the manufacturer’s colour palette and dimensions. If your cat prefers a taller stretch, you might have to buy a different model instead of just adding a few inches of wood.
DIY means you’ll hunt down studs, pre‑drill holes, and maybe wrestle with a level. It feels like a mini‑project, and that can be satisfying – until you realise the brackets don’t line up with the studs and you have to redo everything.
Ready‑made options usually come with pre‑drilled holes that align with standard stud spacing. You still need a stud‑finder, but the heavy‑duty brackets are already attached, so the whole process can be done in under an hour.
When you source the materials, you control quality. A solid pine core with a tightly wound sisal sleeve will outlast a cheap cardboard‑based ready‑made post, especially for a vigorous jumper.
On the flip side, manufacturers test their products for load‑rating – 70 lb or more – and often coat the wood with non‑toxic sealants you might not think of. If you skip that step, the DIY post could warp or splinter over time.
DIY gives you the chance to blend the post into your existing décor. Want a minimalist look? Sand the wood smooth and leave it natural. Prefer a pop of colour? Use pet‑safe paint that matches your wall accent.
Ready‑made designs are usually sleek, but they’re also designed to be a visual focal point. If you love a clean, uniform aesthetic, a designer post might actually look better than a homemade patchwork.
If you’re a first‑time cat‑parent, or you simply don’t have the tools or time, a ready‑made cat scratching post wall mounted can be a stress‑free solution. You get a product that’s been tested for safety, comes with clear instructions, and often includes a warranty.
On the other hand, if you enjoy a weekend DIY sprint, love the idea of a truly personalised piece, and want to squeeze every cent out of your budget, building your own can be rewarding.
Bottom line: weigh cost, customisation, installation effort, durability, and style. Both routes can give your feline a happy outlet – the choice comes down to what fits your lifestyle and patience level.
And remember, the most important thing is that the post is securely anchored and the scratching surface is something your cat actually wants to use.
We’ve walked through material picks, installation hacks, and space‑saving tricks – all so you can give your cat a sturdy, wall‑mounted scratching post that actually works.
At the end of the day, the biggest factor is simple: make sure the post is anchored into studs, uses a durable surface like sisal or cork, and sits at a height your cat can fully stretch. If those three boxes are ticked, the rest falls into place.
So, what’s the next step? Grab a stud‑finder, choose the material that matches your décor, and give those brackets a confident turn. Test the mount with a firm pull – if it holds, you’re good to go.
Remember, whether you went DIY or bought a ready‑made model, the goal is the same – a happy feline and a couch that stays intact. A well‑mounted post can turn a frustrated cat into a calm, content perch‑watcher.
Got a favourite tip or a picture of your new wall post? Share it with the Kaotik kollectionz community and help other cat lovers avoid the common pitfalls.
In short, a properly installed cat scratching post wall mounted gives your feline a safe outlet, protects your furniture, and adds a sleek design touch to any room. Keep the mount solid, the material appealing, and enjoy watching your cat stretch with confidence.
First, locate the studs – they’re the only parts that can hold the weight of a jumping cat. Grab a stud‑finder or tap the wall; a solid thud means a stud. If you’re on drywall with no studs in the right spot, don’t just screw into the plaster. Use heavy‑duty toggle bolts or masonry anchors, but the safest route is always anchoring directly into wood studs.
You can, but you’ll need specialised anchors that spread the load across a larger area. Metal toggle bolts rated for at least 70 lb work well on plasterboard, and you should add a second bracket for extra stability. Keep the post height moderate – the farther the load is from the wall, the more leverage it creates. Still, whenever possible, shift the position a few centimetres so the brackets line up with studs.
Measure your cat’s fully stretched length from front paws to the tip of the tail, then add 2–3 inches. Most adult cats need 30‑35 inches of vertical space to feel a full stretch. Kittens can start a bit lower, around 20‑25 inches, and you can raise the post later. The key is letting the cat extend both front and hind legs without feeling cramped.
Check the surface every month or two. Sisal rope usually holds up 6‑12 months for an active indoor cat; carpet tiles may need swapping sooner if the loops start to fray. When the fibres feel soft or the cat skips the post, it’s a sign the material is wearing out. Having a spare roll of sisal or a replacement tile on hand makes a quick swap painless.
Only use pet‑safe, water‑based paints or sealants that are labelled non‑toxic. Avoid oil‑based finishes, solvents, or any product that gives off strong fumes, because cats love to rub their faces against wood. A light coat of a clear, low‑VOC sealant protects the wood from moisture while staying harmless if your feline decides to give it a sniff.
Placement is everything. Put the post near the furniture the cat currently loves – a sunny window or the spot where they like to perch. Offer at least two different textures (sisal and cork, for example) so the cat can choose. Most cat parents see a noticeable drop in sofa damage within a week, as long as the post feels sturdy and satisfying.
Every three months, give the brackets a gentle tug to make sure they’re still tight. Re‑tighten any loose screws and check the wall for tiny cracks around the anchor points. If you notice wobbling, add a second set of brackets or switch to longer screws that reach deeper into the stud. Regular checks prevent a sudden failure that could scare both you and the cat.
Okay, you’ve already seen the sleek designs and the basic how‑to of installation. Now it’s time to sift through the details that turn a “nice‑looking” post into a long‑lasting cat favourite.
First thing’s first – grab a tape measure and see how tall your cat gets when it fully extends its front paws and rear legs. Most adult tabbies need around 30‑35 inches of vertical space. Add 2‑3 inches so they can really feel the stretch. If you’ve got a lanky Maine Coon, aim for 40 inches; for a petite kitten, 25‑30 inches will do.
Why does this matter? A post that’s too short turns into a quick‑scratch station, and your feline will bounce back to the sofa for the full stretch.
Sisal is the gold standard – it mimics tree bark, is tough enough for an avid claw‑er, yet gentle on pads. Some cats prefer a softer feel, like cork or recycled paperboard, especially older kitties with delicate claws.
Look for a surface that’s replaceable. Over time the fibres will fray, and a replaceable panel saves you from buying a whole new post. The Furmia wall‑mounted scratching post even offers interchangeable sisal tiers, a neat example of this idea in practice.
Sturdy brackets are the unsung heroes. Heavy‑duty steel brackets rated for at least 70 lb give you peace of mind, even if your cat decides to launch off the post like a tiny ninja.
Make sure the screws are long enough to reach the stud – #8 wood screws of at least 2 inches work for typical drywall studs. If you’re on brick or concrete, swap to masonry anchors with the same weight rating.
Pro tip: after you tighten everything, give the post a firm pull (about 20 lb of force). If it holds, you’re golden; if it wiggles, add a second set of brackets or use longer screws.
Where you put the post can make or break its success. Cats love a spot near a sunny window, a doorway, or right next to the piece of furniture they currently attack. The post becomes a visual perch and a scratch outlet all in one.
If you live in a small apartment, consider a low‑profile design that sits just above eye level. That way you keep floor space free and still give the cat a vertical stretch.
Durability isn’t just about the frame; it’s about the surface you’ll be swapping out every six to twelve months. A post with a removable sisal sleeve or a snap‑on paperboard pad will last longer and cost less in the long run.
Also, check the warranty. A 1‑year warranty on hardware and a 6‑month guarantee on the scratching surface signals confidence from the maker.
When you tick all these boxes, you’re not just buying a piece of furniture – you’re giving your cat a safe, satisfying outlet that protects your sofa and keeps the whole household happier.


Leave a comment