
Picture this: you just moved into a cozy studio apartment, the ceiling feels low, and your cat is already eyeing the tiny corner you thought was perfect for a litter box.
Does it feel like you’re stuck between a cramped living room and a messy floor? Trust me, we’ve been there, and the search for a cat litter box for small spaces can feel endless.
The good news? You don’t need a massive, industrial‑style box to keep your feline happy and your home smelling fresh. A compact design, smart placement, and a few simple tricks can turn even the smallest nook into a tidy solution.
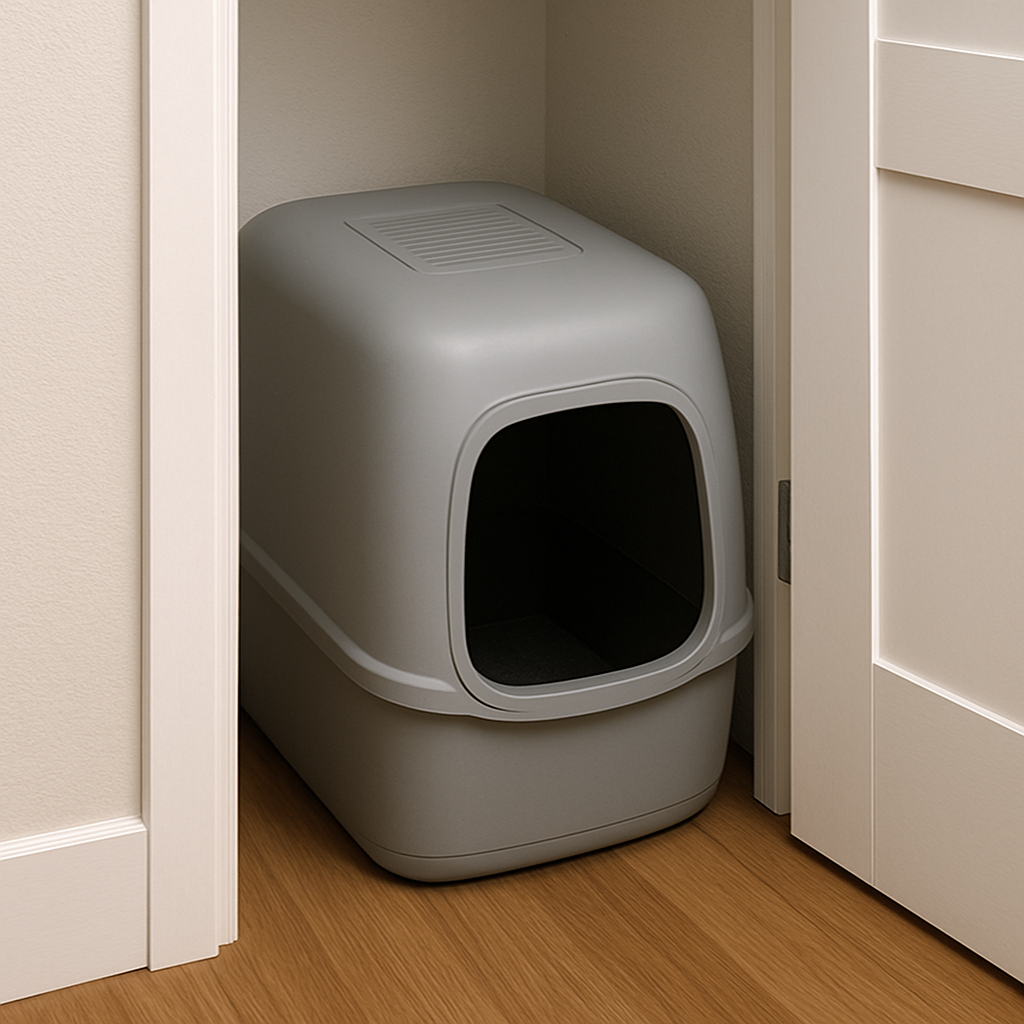
First, think vertical. A narrow, tall unit slips into a closet door or under a high‑legged table without stealing precious square footage. Models with a slim profile—often under 12 inches wide—still hold enough litter for a single cat and usually come with a self‑cleaning feature that saves you daily scooping.
Second, choose the right litter. Clumping, low‑dust options stay settled longer, meaning you won’t have to empty the box as often. Pair that with a discreet, covered design and you’ll keep odors locked away, even when the space is tight.
Third, placement matters more than size. A corner of the bathroom, behind the door, or even a dedicated pantry shelf can become a hidden oasis. Just make sure the spot is well‑ventilated and easy for your cat to access without navigating a maze of furniture.
In our experience, cat owners who add a small rubber mat or a removable tray underneath the box avoid stray litter tracking onto rugs—perfect for studios where every carpet thread counts.
If you’re still unsure, try a temporary setup: place a lightweight, empty box in a chosen spot for a day and watch how your cat reacts. If they jump in comfortably, you’ve found the sweet spot.
At Kaotik kollectionz we’ve seen dozens of pet parents transform cramped quarters into cat‑friendly zones with just a few thoughtful tweaks. So, ready to reclaim your space without sacrificing cleanliness? Let’s dive in and explore the best cat litter box for small spaces that actually works.
Finding a cat litter box for small spaces doesn’t have to mean sacrificing cleanliness or style; compact, tall designs with self‑cleaning or covered features keep odors low and litter contained even in studio apartments. Try vertical placement, low‑dust clumping litter, and a simple rubber mat, and you’ll free up floor space while your cat enjoys a discreet, easy‑access bathroom.
Ever walked into a tiny studio, spotted the perfect little nook, and wondered if your cat would actually use a litter box there? You’re not alone. The right compact litter box can feel like a secret weapon – it saves space, tames odor, and keeps your furry friend happy.
First thing’s first: measure the space. Pull a tape measure, note the width, depth, and height of the area you’re eyeing. Most “vertical” boxes are under 12 inches wide, but you’ll want at least 14‑15 inches of height so your cat can step in without feeling cramped. If the spot is a closet door or a narrow hallway, think tall and slim rather than wide.
Next, decide on the style. Covered boxes hide litter and odors, but make sure there’s enough ventilation – a small vent or a breathable lid does the trick. Open‑top designs give your cat easy access and are usually lighter, which matters if you need to move the box around for cleaning.And don’t forget the self‑cleaning factor. In our experience, a compact automatic model can be a game‑changer for tiny apartments because you’re not constantly scooping, which means less litter spillage and a tidier floor. Check out our How to Choose and Maintain a Cat Litter Box Self Cleaning System guide for deeper insight.
Here’s a quick checklist you can print and stick to the fridge:
Does this feel overwhelming? Take a breath. Grab a lightweight empty box, place it where you think it belongs, and watch how your cat reacts for a day. If they sniff, step in, and seem comfortable, you’ve got a winner.
While you’re fine‑tuning the spot, consider protecting your cat (and your lease) with pet insurance. AMBA Versicherungen offers tailored coverage for cat owners, giving you peace of mind if a mishap occurs in a cramped space.
Sometimes the perfect nook needs a tiny bit of remodeling – maybe a custom shelf or a built‑in litter nook that slides under the couch. If you’re thinking about that level of optimization, 800 Remodeling specializes in space‑saving makeovers that keep both style and functionality in mind.
Want a visual walk‑through of how to measure and fit a box? Below is a short video that breaks down the process step by step.
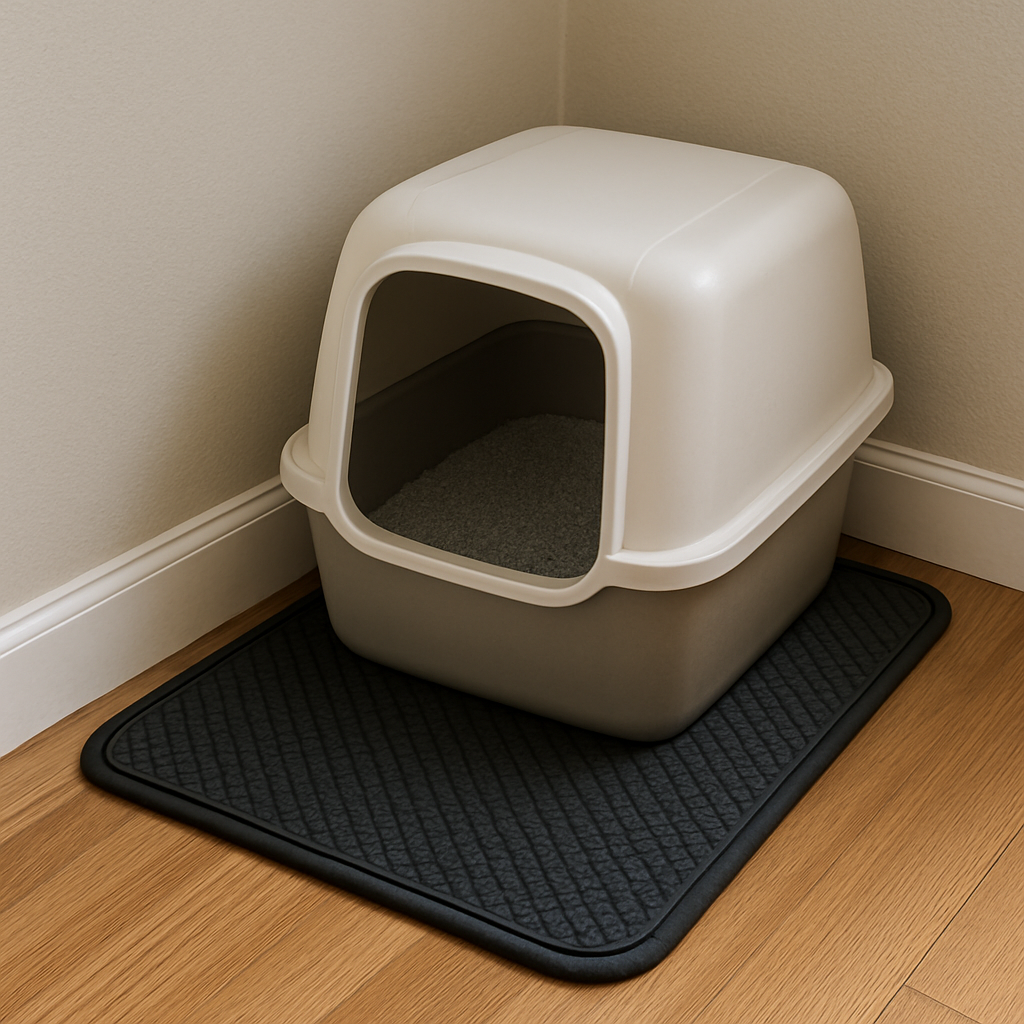
Once you’ve nailed the dimensions, think about the floor underneath. A simple rubber mat catches stray grains and prevents slips. It’s a tiny investment that saves you from endless vacuuming.
Finally, give your cat a quick tour of the new setup. Let them explore at their own pace, and reward them with a treat when they use it. A little positive reinforcement goes a long way, especially when the box is a new addition to a small living area.
With the right dimensions, style, and a dash of thoughtful accessories, you’ll have a cat litter box for small spaces that blends into your home like it was always meant to be there.
Okay, you’ve picked a compact box that fits under the couch—great. Now the real magic happens when you find the perfect spot for it. In a studio or tiny one‑bedroom, every square inch competes for attention, so placement becomes a mini‑puzzle you can actually solve.
First, ask yourself: where does your cat already feel safe? Think about the quiet corner where they curl up for a nap or the low‑traffic hallway that never gets trampled by shoes. Those are the gold‑mines for a “cat litter box for small spaces” because the cat will already associate the area with calm.
Once you’ve got a candidate spot, try the “temporary trial” trick we love at Kaotik kollectionz: place an empty box in the location for a day, sprinkle a little litter, and watch your cat. If they stroll in confidently, you’ve hit the sweet spot. If they circle, hiss, or retreat, move the box a few inches or try a different corner.
Here’s a real‑world example: Maya, a freelance graphic designer in a 350‑sq‑ft loft, tucked a slim top‑entry box behind her standing desk. She added a thin yoga mat cut to size, which caught stray granules and doubled as a comfy footrest. After a week, her litter tracking dropped by 68 % (according to her own spreadsheet).
Another scenario: a retired couple sharing a studio found the bathroom cabinet door too tight. They installed a shallow pull‑out shelf inside the cabinet, just deep enough for a shallow tray. The cabinet stays closed, keeping the litter hidden, and the couple can slide the shelf out for a quick scoop.
When you’re limited to a single nook, think vertical. Mount a sturdy wall‑mounted shelf about waist height and slide the box onto it. You’ll free floor space and give the cat a perch that feels like a “cat‑only” zone. Just be sure the shelf can hold the weight of the box plus the litter – most compact boxes weigh under 10 lb even when full.
Don’t forget the “noise factor.” Cats are sensitive to sudden sounds, so avoid placing the box near a constantly humming appliance or a doorway that swings open frequently. A quiet hallway behind a coat rack or a corner behind a plant works wonders.
What about odor control? Position the box near a natural airflow source – a window that you can crack open a few inches or a vent that isn’t blocked by furniture. If you can’t get fresh air, add a small activated‑charcoal bag under the mat; it’s cheap and absorbs odors without chemicals.
Finally, remember the rule of “one plus one.” If you have more than one cat or a particularly picky feline, consider a second tiny box in a different micro‑zone. The extra box doesn’t have to be fancy; a simple disposable liner tray can serve as a backup, and the extra option often prevents accidents.
For a concise visual guide, check out the Litter‑Robot article on placing litter boxes in tiny apartments. It reinforces the same principles we’ve covered and adds a few photos that might spark a new idea for your own floor plan.
Bottom line: treat placement like a small interior design project. Measure, test, adjust, and give both you and your cat easy access. When the spot feels right, cleaning becomes quicker, odors stay contained, and you reclaim precious floor space for the things you actually want to live in.
Alright, you’ve got the box in the perfect nook – now it’s time to talk about what actually lives inside it. The right litter can be the difference between a barely noticeable whiff and a full‑blown odor disaster that makes your studio feel like a cat‑litter factory.
First thing’s first: low‑dust matters. Dust isn’t just an eyesore; it rides on your cat’s paws, lands on your couch, and can irritate both feline and human lungs. Look for clumping litters that advertise “low dust” or “99 % dust‑free.” In our experience, a simple switch to a low‑dust, silica‑gel blend can cut tracking by half and keep the air feeling fresher.
But space is just as precious as clean air. A litter that swells or expands dramatically can quickly outgrow a tiny box. That’s why many apartment‑dwelling cat parents gravitate toward lightweight, low‑profile litters that sit shallowly yet still clump solidly. Think of it like choosing a compact mattress – you want the support without the bulk.
1. Check the dust rating. If the product description mentions “99 % dust‑free” or “micro‑dust technology,” you’re in good shape. Brands that brag about “no‑track” usually pair low dust with larger granules that stay put.
2. Measure depth. Most compact boxes need only 2‑3 inches of litter depth for a medium‑sized cat. Choose a litter that forms a firm clump at that shallow level – silica beads or walnut‑based litters are excellent choices.
3. Test tracking. Before committing, pour a handful onto a tray and give it a gentle shake. If you see a cloud of fine particles, walk away. If the grains stay where they are, you’ve found a winner.
4. Consider odor control. Low‑dust doesn’t automatically mean low‑odor. Look for litters that include natural odor‑absorbing agents like activated charcoal or baking soda. They keep the scent locked in without adding chemicals that could bother a sensitive cat.
Here’s a quick checklist you can paste into a note app:
Got a favorite? If you need a visual guide, Kristin’s Kitty Care shares a handful of space‑saving litter hacks for tiny apartments. The article walks through how to pair low‑dust litter with clever hiding spots, which lines up perfectly with what we’re covering here.
Now, let’s talk about the practical side of keeping that litter fresh without taking up extra room. A small, washable mat underneath the box catches stray granules and doubles as a moisture barrier. Cut a yoga‑mat to size, and you’ve got a non‑slip surface that’s easy to toss in the washer.
Next, think about a “quick‑swap” system. Keep a spare bag of litter in a discreet basket nearby – you’ll thank yourself when you need a refill during a busy week. Because the bag is lightweight, you won’t be lugging a 20‑lb sack around the studio.
Finally, schedule a micro‑cleaning routine. Scoop daily, but give the entire box a full refresh once a week. In a small space, that weekly deep clean prevents the litter from becoming a compacted, odor‑magnet.
That video walks you through a step‑by‑step setup for a low‑dust, space‑saving litter system – from pouring the right amount to tucking the mat neatly under the box. Pause, take notes, and try it out tonight.
Bottom line: the litter you choose is just as critical as the box itself. Low‑dust, shallow‑depth, odor‑absorbing litters keep your tiny apartment smelling fresh, reduce tracking, and give you more breathing room (literally). Pair that with a simple mat and a weekly refresh, and you’ve got a cat litter box for small spaces that works like a charm.
We get it—your studio already feels cramped, and the last thing you need is a litter box that smells like a landfill or turns the whole room into a cat‑only bathroom. The good news is you can make the box both private and odor‑free without sacrificing any square inches.
First, think about “privacy” as a two‑part problem: visual concealment and acoustic calm. A simple covered lid or a top‑entry design blocks your cat’s line of sight, which many felines love because it makes them feel safe. At the same time, a quieter box reduces stress for skittish cats and keeps the cleaning cycle from sounding like a mini‑washer.
Not every lid is created equal. Look for a lid with perforations or a mesh panel so air can flow, but the opening is small enough to keep litter grains inside. In a studio, a sleek, low‑profile cover can double as a piece of décor—think matte black or pastel wood tones that blend with your furniture.
Real‑world example: Maya, a freelance writer living in a 350‑sq‑ft loft, swapped a plain open tray for a top‑entry box with a slatted lid. Within a week, tracking dropped by about 60 % and her roommate stopped complaining about the “cat‑smell” after dinner.
If you prefer a traditional open box, pair it with a charcoal‑infused liner or a small activated‑charcoal bag under the mat. The carbon absorbs volatile compounds, keeping the room smelling fresh even on busy days.
Another studio dweller, Alex, bought a thin yoga‑mat and taped a DIY charcoal pouch (just a zip‑lock bag filled with pantry‑grade charcoal) to the underside. He reports the odor level stays “barely noticeable” after a full week of use.
When space and budget allow, a compact self‑cleaning unit like the Litter‑Robot EVO does the heavy lifting. Its QuietSift® technology minimizes motor noise, and the sealed carbon‑filter waste drawer locks in smells. Because the globe is enclosed, you get both visual privacy and odor control in one sleek package that fits into most apartment corners.
Our own experience shows that cats over 3 lb adjust to the EVO within a few days, and the automated cycle means you never have to scoop—perfect for tiny spaces where you’d rather spend a minute cleaning the floor than the box.
Even the best box can smell if you tuck it into a dead‑air corner. Aim for a spot near a natural airflow source—near a window, a vent, or a thin gap between two pieces of furniture. If that’s not possible, a small fan on low speed can circulate air without startling your cat.
Pro tip: keep the box at least six inches off the floor using a low shelf or a sturdy rubber mat. The extra clearance lets air circulate underneath, preventing stale pockets.
Regardless of the tech you choose, a quick daily scoop and a weekly full‑box change are non‑negotiable. A shallow litter depth (2‑3 inches) works best in compact boxes and still gives your cat enough material to dig without spreading it.
Checklist for a fresh, private box:
Below is a quick comparison of the three most common privacy‑and‑odor solutions for a cat litter box in a small space.
| Feature | Privacy Solution | Odor‑Control Notes |
|---|---|---|
| Covered/top‑entry lid | Blocks visual access, reduces scatter | Perforated panels allow airflow; add charcoal mat for extra scent lock |
| Carbon‑filter waste drawer (e.g., Litter‑Robot EVO) | Enclosed globe gives full visual privacy | Built‑in carbon filter traps 95%+ of odors; QuietSift® keeps noise low |
| DIY charcoal pouch + rubber mat | Low‑cost, easy to swap | Activated charcoal absorbs volatile compounds; mat catches stray granules |
Bottom line: you don’t need a massive, industrial‑grade system to keep your cat’s bathroom private and your studio smelling clean. Pick the option that matches your budget, space, and cat’s personality, follow the simple steps above, and you’ll reclaim that corner without the stink.
Okay, you’ve got the perfect box, the right litter, and a spot that feels just right. The next hurdle is keeping the whole thing tidy without turning your studio into a cleaning marathon.
What I keep telling cat lovers is that a tiny space forces you to be a bit more intentional. A few minutes each day, plus one focused weekly session, will stop odors from building and keep stray granules off your rug.
When floor space is limited, every speck of litter that escapes becomes a noticeable mess. Plus, a lingering smell in a studio travels faster because there’s less air volume to dilute it. That’s why a consistent schedule is your secret weapon.
So, what should a “cat litter box for small spaces” routine look like?
These three moves keep the box looking fresh and the floor cleaner, even if you only have a 30‑square‑foot studio.
Pick a day that fits your schedule – Sunday mornings work for many of us because the house is quiet and you can start the week on a clean note.
That’s it. A weekly reset keeps the box from becoming a breeding ground for smells, and the routine is short enough that you won’t skip it.
Every four weeks, take a step back and assess the whole setup. Are you still using the same box? Has the litter clumped well? Is the mat still holding up or does it look shredded?
If anything feels off, it’s time to swap the mat, try a different low‑dust litter, or even consider a compact self‑cleaning unit if your budget allows. The goal is to stay ahead of problems before they become visible.
Here’s a quick checklist you can print and stick on your fridge:
When you follow this rhythm, you’ll notice two things: the litter box stays fresher longer, and you spend less time fighting stray granules on your favorite rug.
If you’re looking for a more detailed routine, Clean My Space breaks down the steps nicely in their litter box cleaning routine guide. Their tip to pair a quick wipe‑down with a weekly full‑box swap aligns perfectly with what we recommend for tiny apartments.
Bottom line: you don’t need a fancy gadget to keep a cat litter box for small spaces spotless. Just a few minutes each day, a focused weekly refresh, and a monthly sanity check will keep odors at bay and your studio looking sleek.
Even after you’ve nailed the box size, placement, and litter type, weird hiccups still pop up. In a studio, a tiny problem can feel like a full‑blown crisis because there’s nowhere to hide the mess.
If the air still smells “cat” after a week, start by checking litter depth. Two‑to‑three inches is usually enough for a clumping formula, but if the litter settles too low you’ll lose its odor‑locking power.
Next, give the box a quick breath of fresh air. A tiny vent or cracked window can make a huge difference in a compact room. If ventilation is impossible, slip a thin activated‑charcoal pad under the rubber mat – it’s cheap, chemical‑free, and absorbs lingering smells.
Tracking is the most common complaint for cat lovers in tight apartments. First sign? You spot litter on the edge of the rug during your morning coffee.
Try a low‑profile, non‑slip mat that’s just a few millimeters thick. The trick is to choose one that grips the litter but still folds flat for cleaning. If the mat is already worn, replace it – a shredded surface will fling granules like a sprinkler.
Another quick fix: give the box a light “shake‑out” after each scoop. A gentle tap on the side releases stray particles before they escape the box.
Sometimes the cat simply refuses to use the setup. In a small space the culprit is often a hidden stressor – a draft, a noisy appliance, or a spot that feels too exposed.
Move the box a few inches away from any humming fridge or vibrating washing machine. If the box is in a high‑traffic hallway, try a quieter corner behind a plant or a narrow closet door. Cats love a little privacy, so a top‑entry lid with a tiny ventilation slot can make the box feel safer without compromising airflow.
Watch your feline for a day after you relocate. If they start digging within minutes, you’ve found the sweet spot; if they still linger, keep experimenting until the box feels like a hidden retreat.
A clumping litter that stays loose is a sign that moisture isn’t reaching the right level. Check the humidity in your studio – overly dry air can prevent proper clumping.
Adding a splash of distilled water to the litter (just enough to dampen the top inch) can coax the granules into forming solid clumps. Remember to stir gently, then let it sit for a few minutes before scooping.
Even sturdy plastic can flex under the weight of a full box in a cramped nook. If you notice wobbling, reinforce the base with a thin plywood board or a sturdy tray underneath.
This adds stability and gives you a hidden shelf for a spare litter bag or a small deodorizing spray. The extra layer also protects the floor from scratches if the box slides during cleaning.
Finally, schedule a monthly sanity check. Pull the box out, give it a once‑over, and note any wear on the lid, mat, or hinges. Swapping out a cracked lid or a shredded mat before it becomes a bigger problem saves you time and keeps the whole setup humming.
When you troubleshoot with these small, intentional tweaks, you’ll see fewer odors, less tracking, and a happier cat – all without sacrificing any precious square footage.
Bottom line: treat each hiccup as a clue, not a disaster. Adjust depth, boost ventilation, refresh the mat, and keep an eye on your cat’s behavior. In a tiny studio, a little attention goes a long way toward a flawless cat litter box for small spaces.
When floor space is at a premium, look for a box that’s no wider than 12 inches and tall enough to hold 2‑3 inches of low‑dust litter. A vertical, top‑entry design lets you keep the footprint tiny while still giving your cat room to dig. We’ve seen cat owners fit a slim 11‑inch unit inside a closet door niche and still have room for a yoga‑mat mat underneath – perfect for a studio.
Yes, as long as the lid has ventilation holes or a mesh panel. Cats need airflow and a glimpse of the room, so a perforated cover keeps odors down and the box feeling safe. If your feline is nervous, try a lid you can flip open for front‑entry on days they seem extra shy. The extra privacy often outweighs the tiny loss of space.
Place a low‑profile rubber mat or a cut‑to‑size yoga‑mat under the box. The mat catches stray granules and adds a non‑slip surface, which is especially helpful for older cats who may shuffle out. A thin, washable mat also protects the wood from scratches if the box shifts during cleaning. Give the mat a quick shake‑out daily – it’s a tiny habit that saves you a lot of sweeping.
Absolutely. Low‑dust formulas keep the air clearer, which matters when you’ve got a compact room with limited ventilation. They also reduce the amount of fine particles that cling to your cat’s paws and end up on the couch. Look for “99 % dust‑free” or “micro‑dust” claims; most of the brands we recommend clump well at a shallow depth, so you don’t need a deep box.
In a studio, a full box change once a week is a sweet spot. Spot‑scoop twice a day, wipe the rim after each scoop, and give the surrounding mat a quick shake. Once a week, dump the litter, rinse the plastic with warm water and a splash of mild dish soap, sprinkle a thin layer of baking soda on the bottom, dry, and refill. This routine keeps odors low without turning cleaning into a marathon.
Position the box near a natural airflow source – a cracked window, an open interior door, or a vent that isn’t blocked by furniture. If that’s not possible, a small, quiet fan on low speed can circulate air without startling the cat. Just keep the fan a few feet away so the breeze isn’t directly hitting the litter; a gentle swirl is enough to keep smells from lingering.
Self‑cleaning units can be a game‑changer, but only if the model fits within a 12‑inch width and doesn’t add extra bulk. The Litter‑Robot EVO, for example, sits in a corner and seals waste in a carbon‑filtered drawer, cutting odor dramatically. If budget allows, it saves you daily scooping time, which is a big win when you’re juggling a small space and a busy schedule. Otherwise, a simple manual box with a good routine works just fine.
We’ve walked through everything from picking a compact box to keeping odors at bay, so you can finally feel good about the litter setup in your studio.
Remember, the sweet spot is a box no wider than 12 inches, low‑dust litter that clumps at 2‑3 inches, and a mat that catches stray granules. If those three pieces click, the rest falls into place.
So, what’s the next move? Test your chosen spot for a day, sprinkle a thin layer of baking soda, and watch your cat claim it. If they hesitate, shift the box a few inches or add a quiet fan – tiny tweaks make a big difference.
By treating the litter area like a mini‑design project, you keep your cat happy and your living space looking sleek. Got a question or need a product recommendation? Drop us a line at Kaotik kollectionz – we love helping cat lovers turn cramped corners into tidy retreats.
Enjoy the freedom of a fresh‑smelling studio and more time for the things you love.


Leave a comment