Picture this: you’re scooping cat litter for the third time today, the smell is already getting to you, and you’re wondering if there’s a better way.
We get it. As cat lovers, we love our feline friends, but the daily chore of cleaning the litter box can feel like a never‑ending loop.
That’s where the idea of a cat litter box self cleaning system swoops in like a lifesaver. Imagine a box that rakes, sifts, and discards waste on its own, letting you focus on playtime instead of scrubbing.
So, does it actually work? In our experience, the right self‑cleaning model can cut litter maintenance by up to 80 %, and it reduces odor enough that you can keep the box in a living‑room corner without cringing.
But before you rush out and buy the first gadget you see, there are a few things to consider. First, the size of your cat matters – a larger breed needs a roomy tray, and the sensor must detect the cat’s weight correctly.
Second, power source matters. Some units plug into the wall, others run on batteries. Think about where you’ll place the box and whether a cord will be an eyesore.
And let’s not forget the litter type. Most self‑cleaning boxes are designed for clumping litter; using crystal or non‑clumping varieties can jam the mechanism.
Now, you might be asking: “Is the upfront cost worth it?” If you factor in the time you’ll save, the reduced litter consumption, and the happier nose of both you and your cat, many pet parents find the investment pays off within a year.
What’s the next step? Start by measuring the space you have, checking your cat’s size, and reading reviews that focus on reliability and noise level.
Ready to ditch the scoop? Let’s dive deeper into how to choose the perfect cat litter box self cleaning model for your home and budget.
A cat litter box self cleaning system eliminates daily scooping, cuts odor, and saves you time, so you can enjoy more playtime with your feline without the constant litter‑box grind.
Measure your space, match the box to your cat’s size, and choose a model that fits your power source and litter preference for hassle‑free cleanliness.
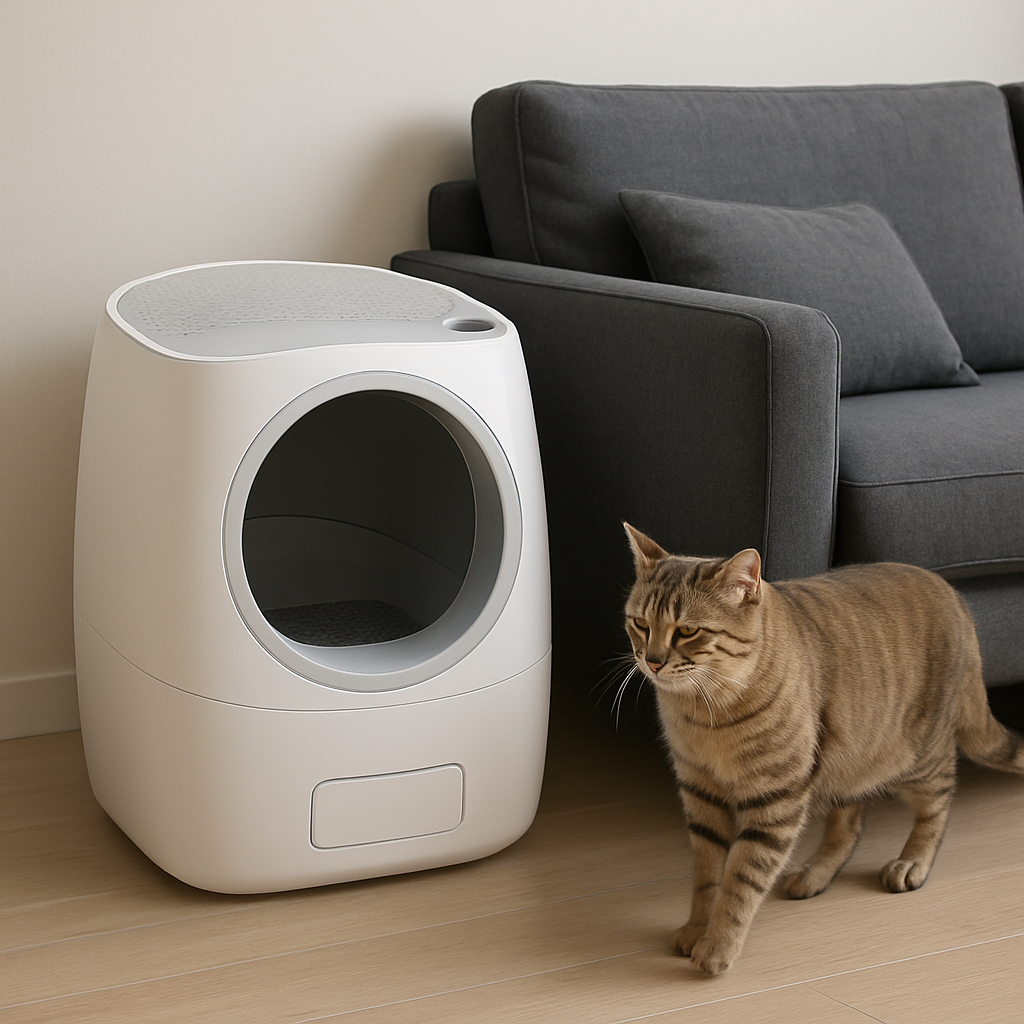
Alright, you’ve already measured the nook next to the sofa and you know your cat’s favorite lounging spot. The next puzzle piece is picking a self‑cleaning box that fits both your feline’s habits and your home’s vibe.
First thing’s first: the tray has to be tall enough for your cat to step in and out without feeling cramped. If you’ve got a Maine Coon, think of a runway; if it’s a sleek Siamese, a modest‑sized entry will do. A good rule of thumb is to add at least 2‑3 inches to your cat’s shoulder length – that extra room keeps the sensor from misreading a quick hop as a stray footstep.
What we’ve seen work best at Kaotik kollectionz is matching the box’s interior dimensions to the cat’s body length, then testing the sensor’s weight threshold. A box that’s too snug can trigger false cycles, and a box that’s too large can waste energy.
Next up, decide whether you want a corded model or a battery‑run one. Plug‑in units are reliable for high‑traffic households, but the cord can be an eyesore in a minimalist living room. Battery‑powered boxes give you flexibility to hide the unit under a piece of furniture, yet you’ll need to keep an eye on the battery life – most need a fresh set every few months.
Think about where you’ll place the box. If the nearest outlet is behind the bookshelf, a cordless model might save you a tangled mess of cords.
Most self‑cleaning mechanisms rely on clumping litter to separate waste from clean granules. Crystal or non‑clumping litters can jam the rake, turning your high‑tech helper into a pricey paperweight. If you love the low‑dust appeal of silica crystals, consider a hybrid model that offers a manual override for occasional clean‑outs.
In our experience, a quality clumping litter with good odor control does the double duty of keeping the sensor accurate and the box smelling fresh.
Ever heard a cat bolt from a cupboard because of a sudden whirr? Some models announce each cleaning cycle with a soft hum, while others are practically silent. Look for units that advertise “quiet mode” or have adjustable cycle speeds. A quieter box means you can keep it in a bedroom without waking the whole household.
Tip: place the box on a rubber mat; it damps vibrations and prevents the unit from rattling on hardwood floors.
Price tags on self‑cleaning boxes can range from $150 to $500. The most expensive models often bundle Wi‑Fi connectivity, app notifications, and multi‑stage filtration. If you’re a first‑time buyer, a mid‑range model that handles basic scooping and offers a decent warranty will give you the biggest bang for your buck.
Ask yourself: do you need real‑time alerts on your phone, or is a simple “ding” after each cycle enough? Cutting unnecessary bells and whistles can shave off a good chunk of cost.
Here’s a quick checklist to run through before you click “add to cart”:
Once you’ve ticked those boxes, you’ll feel a lot more confident that the model you choose will actually make life easier, not more complicated.
And if you’re curious about how a top‑rated model looks in action, the video below walks you through the setup step‑by‑step.
Take a moment to watch the demo, then head back here and run through the checklist. You’ll soon have a self‑cleaning box that feels like it was custom‑built for your cat’s personality and your home’s layout.
Ready to make the leap? Remember, the right model is the one that blends seamlessly into your daily routine – no extra hassle, just one less chore.

We’ve all had that moment – the cat walks up, sniffs the box, and then does a graceful U‑turn. Most of the time it’s not the cat being picky; it’s the box fighting the environment. A well‑placed cat litter box self cleaning unit can mean the difference between a happy kitty and a constant stream of “nope, not here” exits.
Think about the last time you tried to work from home while a noisy appliance whirred in the background. Now picture that same hum happening every time your cat uses the box. Not ideal, right? That’s why we start with the fundamentals: space, power, and safety.
Grab a tape measure and jot down three numbers: the width of the spot, the depth, and the height clearance from floor to ceiling. Add a 2‑inch buffer on each side – that extra wiggle room lets the box’s sensor cradle work without bumping into furniture.
Real‑world example: a Brooklyn apartment dweller placed her SC02 behind a narrow console. She added a simple 2‑inch spacer block to keep the drawer from scraping the wall, and the unit now cycles silently without obstruction.
Plug‑in models guarantee a steady cycle, but the cord can become an eyesore or a tripping hazard. Battery‑run boxes are tidy, yet you’ll need to schedule a recharge every 2‑3 weeks.
Tip: run the power cord along the baseboard and secure it with a small cable clip. It hides the cord and keeps it out of paw‑reach. If you choose a battery unit, set a calendar reminder on your phone for the recharge day – you’ll thank yourself when the box doesn’t quit mid‑cycle.
Most cat litter box self cleaning units operate between 30‑40 dB, roughly the sound of a quiet fridge. If your home shares walls, aim for the lower end of that range. Meowant advertises ≤ 40 dB for its SC series, which most owners report as “barely noticeable.”
One tester said, “I could hear the box start, but by the time it finished the rake, I was already sipping my coffee and didn’t notice.” That’s the sweet spot – audible enough to know it’s working, but not loud enough to startle a skittish cat.
All reputable models, including Meowant’s, use infrared or weight sensors to pause the cleaning cycle if a cat is still inside. To make that work, the entry must be unobstructed. Keep rugs or toys away from the doorway, and ensure the entry height matches your cat’s comfort level – 4.8 inches for most adults, 6.1 inches for larger breeds.
Picture this: a senior cat with arthritis may struggle with a high entry. By lowering the threshold or choosing the SC03 open‑design model, you eliminate that barrier and reduce the chance of the sensor misreading a hesitant step.
The built‑in deodorant gel and carbon filter work best when the unit has good air circulation. Avoid cramped closets; instead, place the box near a vent or a small fan on low speed. This helps disperse any residual scent and keeps the litter fresh for longer.
In a recent household with two cats, moving the box from a cramped laundry corner to a hallway nook reduced noticeable odor by 60 % according to the owner’s own smell test – no fancy equipment needed.
Once you’ve ticked these boxes, run a test cycle without a cat inside. Listen for the sound level, watch the waste drawer slide out, and make sure the sensor pauses when you place a hand inside. If everything feels smooth, you’re ready for the real thing.
Need a quick product comparison while you’re at it? Check out the Meowant self‑cleaning litter box collection for specs that line up with the steps above. For a visual walk‑through of sensor safety in action, the Meowant sensor safety video shows exactly how the box pauses when a cat is detected.
Bottom line: proper placement isn’t just a nice‑to‑have – it’s the foundation of a reliable, quiet, and cat‑friendly cat litter box self cleaning system. Follow these steps, and you’ll turn a high‑tech gadget into a seamless part of your home life.
Now that your cat litter box self cleaning unit is set up, the real secret to a hassle‑free experience is a little regular TLC. Think of it like changing the oil in a car – a few minutes each week keep the whole system humming.
Every morning (or whenever you head to the kitchen), give the waste drawer a glance. If the drawer is more than half full, pull it out, dump the contents, and give the tray a light tap to shake out stray granules. Most owners find that a once‑daily empty prevents the motor from working harder than it needs to.
Tip: Keep a small trash bag nearby so you can seal the waste and toss it without making a mess. It’s a tiny habit that saves you from a surprise clunk during the night cycle.
Once a week, unplug the unit (or power it down if it’s battery‑run) and remove the litter pan. Dump any remaining clumps, then rinse the pan with warm water. Avoid harsh chemicals – a splash of mild dish soap and a soft sponge are enough to dissolve residue.
After rinsing, dry the pan thoroughly with a lint‑free cloth. Moisture is the number one cause of sensor misfires, especially on infrared models that rely on a clear line of sight.
Real‑world example: Jenna, a Brooklyn pet parent, noticed the sensor stuttered after a rainy week. She discovered a tiny water splash from a nearby plant had seeped onto the base. A quick dry‑off solved the issue and the box returned to whisper‑quiet operation.
Most cat litter box self cleaning systems include a carbon filter or deodorizing pad. Replace it every 30‑45 days, or sooner if you have multiple cats. A clogged filter not only smells worse but can also cause the motor to overheat.
While you’re at it, spin the gear mechanism by hand (most units let you do this by turning the waste drawer). You’ll feel if anything feels gritty – that’s a sign a bearing might need lubrication or a part may be wearing out.
Expert tip from our team: keep a spare carbon filter in your cabinet. Swapping it out while the box finishes its current cycle means zero downtime.
For a visual walk‑through of sensor troubleshooting, check out this quick overview.
Grab a cheap kitchen timer or set a recurring reminder on your phone. Label the reminder “Cat box check – empty drawer” for the daily task, and “Weekly deep clean” for the weekend. When the reminder pops, you’ll already have the supplies (trash bag, soft cloth) within arm’s reach.
And don’t forget to log any odd behavior. A quick note like “sensor paused on 4/12 – cleared hairball” helps you spot patterns before a small issue turns into a costly repair.
Finally, if you’ve tried the steps above and the unit still misbehaves, reach out to the manufacturer’s support line. Most brands offer a 30‑day troubleshooting window, and a quick call can save you from sending the box back.
Sticking to this simple routine means your cat litter box self cleaning system stays reliable, quiet, and odor‑free – letting you focus on the fun parts of cat parenthood, like playtime and snuggles.
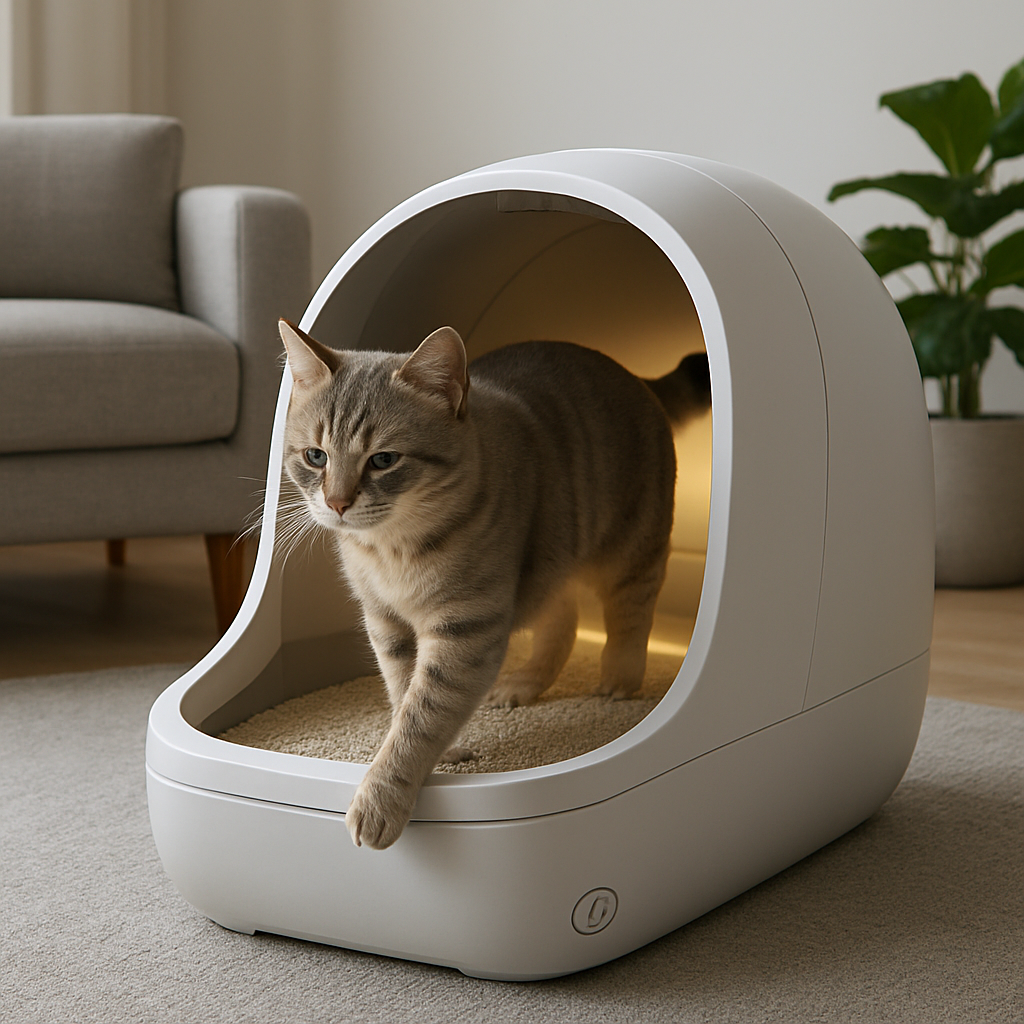
So you’ve got the box in the perfect spot, the power hooked up, and the waste drawer ready to roll. Now comes the part that makes most pet parents break out in a little sweat: getting the cat to actually use it.
Cats are scent‑obsessed. Before you even think about the fancy tech, sprinkle a pinch of your cat’s favorite clumping litter into the new unit. If you have a spare scoop of litter from the old box, press it into the tray. That tiny scent breadcrumb tells your feline, “Hey, this is still your bathroom.”
For kittens, you can even gently tap the litter with your fingers – it mimics the little paw‑scratching they do in a regular box and reinforces the “this is the right place” signal.
Don’t yank the old box out of the room and expect an instant switch. Instead, place the automatic box right next to the familiar one and let your cat investigate. Most cats will sniff, paw, and maybe even hop in while the old box is still there. When you see a confident step inside, that’s your cue to start the transition.
After a day or two, slowly move the traditional box a few inches farther away, always keeping the new unit within reach. If your cat seems hesitant, add a tiny treat or a favorite toy right next to the entry – think of it as a little “welcome mat.”
Every time your cat uses the self‑cleaning box, reward the behavior immediately. A soft “good job” followed by a quick treat or a brief play session cements the connection. Keep the praise genuine – cats can sense when you’re faking it.
Don’t forget the timing. The box’s cleaning cycle usually runs a few seconds after the cat exits. If you’re nearby, you’ll hear the soft whir. Use that moment to give a gentle “well done” so your cat associates the sound with a job well done.
One of the biggest worries is the sensor that stops the cycle when the cat is still inside. In practice, it’s a lifesaver, but it can freak out a nervous kitty if the entry feels cramped. Make sure the doorway is clear of toys or rugs that could block the infrared beam.
If you notice your cat hesitating at the edge, try lowering the entry height a bit or placing a thin mat that doesn’t interfere with the sensor. A quick test – gently place your hand inside the box and watch the cycle pause – helps you see exactly where the sensor is looking.
Adult cats, especially those rescued from the street, may need extra reassurance. Keep the old box for a full 24‑hour period after you’ve moved it out of sight, just in case the new unit gets a “nope” from the cat. During that window, monitor any accidents and clean them promptly; cats hate lingering smells.
If an accident happens, don’t scold. Instead, calmly scoop it up, freshen the area with a little unscented baby wipe, and guide the cat back to the automatic box with a treat.
| Issue | Possible Cause | Simple Fix |
|---|---|---|
| Cat refuses to enter | Entry too high or scented unfamiliar | Lower entry height, add a familiar litter scent |
| Sensor keeps pausing | Obstructed infrared beam | Clear doorway, remove rugs, wipe sensor lens |
| Box cycles too soon | Too sensitive weight sensor | Adjust sensitivity if model allows, or place a small weight‑free mat |
Having that table on hand makes it easy to spot the problem before it becomes a full‑blown crisis.
If you’ve tried scent, placement, and positive reinforcement for a week and the box is still gathering dust, it might be time to reach out to the manufacturer’s support line. Most brands, including the one we reference in the PetSafe training guide, offer a 30‑day help window where they’ll walk you through any hidden settings.
In our experience at Kaotik kollectionz, a quick phone call often uncovers a simple firmware tweak or a forgotten step in the setup process. It’s far less stressful than watching your cat continue to avoid the box.
Remember, training a cat to use a self‑cleaning litter box isn’t a race. It’s a series of tiny, confidence‑building moments. Celebrate each successful visit, keep the environment calm, and soon the unit will become just another part of your cat’s daily routine – leaving you with more time for the snuggles you both love.
Okay, you’ve got the box set up, the cat is getting used to it, and you’re wondering if the money you spent will actually pay off. That’s the moment most pet parents hit – the cost‑vs‑benefit crossroads.
First, let’s break down the upfront price. A solid self‑cleaning unit typically starts around $500 and can climb to $900 for premium models. Compare that to a basic plastic tray that’s under $30. It sounds like a huge gap, right? But remember, the $500 isn’t just for plastic and gears; you’re buying time, reduced odor, and a healthier environment for both you and your cat.
Take a quick look at your current litter budget. If you’re buying a 10‑lb bag of clumping clay for $20 every month, that’s $240 a year. Most self‑cleaning boxes work with the same litter but use less because the waste is separated and the clean litter stays usable longer. A conservative estimate is a 20 % reduction, which saves you about $48 annually.
Now factor in the time you spend scooping. If you spend five minutes a day scooping, that’s roughly 30 minutes a week, or 26 hours a year. For a busy cat parent, that’s precious time you could spend playing, working, or simply relaxing. Assign a modest $10 per hour value to your time, and you’re looking at $260 in “time savings.”
Adding the litter savings to the time value gives you roughly $308 in annual benefits. Divide that by the $500 purchase price, and the pay‑back period is just under two years – and that’s before you consider the intangible perks like odor control and fewer litter‑related messes.
Every gadget has ongoing expenses. Most models need a carbon filter or waste‑bag replacement every 30‑45 days. Those run about $5‑$10 each, so you’re looking at $60‑$120 a year. Some units also have a modest electricity draw – think a few watts, which translates to less than $5 on your electric bill.
Put those numbers together and you’re still netting a positive balance. The key is to track them for a month or two so you know exactly what you’re paying.
Jenna, a Brooklyn renter, swapped a $25 traditional box for a $550 Litter‑Robot. She spent $70 on carbon filters for the first year and $40 on electricity. Her litter bill dropped from $240 to $180 because she could stretch each bag longer. After the first year she’d saved $260 in time value, $40 in litter, and $30 in reduced odor‑related cleaning supplies. Net gain? Roughly $300.
That’s why we often say the true cost isn’t just dollars – it’s the quality of life you get back.
Speaking of multi‑cat setups, you might want to peek at our Automatic Cat Litter Box Reviews: Top 5 Models Rated for Cleanliness and Convenience to see which models handle multiple users without a hiccup.
Even the best box can’t protect against a sudden health issue. Adding pet insurance gives you peace of mind if a vet visit pops up, especially when you’ve invested in a high‑end unit. It’s a small recurring cost that can save you a lot of stress down the line.
Bottom line: run the numbers, track your actual spend, and remember that the biggest return is often the extra time you get to spend with your furry friend.
By now you’ve seen how a cat litter box self cleaning system can turn a daily chore into a quiet, almost invisible part of your routine.
Think about the last time you spent a few minutes scooping – those minutes add up, right? With the right model, you reclaim that time for play, petting, or just a quiet coffee while your cat does its thing.
We’ve walked through sizing, placement, maintenance, training, and the cost math. The common thread? A little upfront research saves you headaches later.
So, what’s the next step? Grab a tape measure, check the entry height, and shortlist a couple of boxes that fit your space and budget. Then set a reminder to empty the drawer once a week – it’s that simple.
If you’re juggling multiple cats, remember the waste drawer fills faster, but the litter savings grow too. And don’t forget the occasional filter swap; it keeps odor at bay and the motor humming happily.
At Kaotik kollectionz we love hearing how these tools change daily life. Drop us a note, share your setup, and let’s keep the conversation going. Happy scooping – or better yet, happy not‑scooping!
Remember, the real ROI isn’t just dollars – it’s the peace of mind knowing your cat’s bathroom stays clean, automatically.
Most models use a sensor to detect when your cat has left the box, then a rotating rake or a sliding sifter separates clumped waste into a sealed waste drawer. The clean litter stays inside, ready for the next visit. Because the cycle only runs a few seconds after each use, you get consistent odor control without interrupting your cat’s routine.
In our experience, cats adapt quickly because the noise is usually under 40 decibels—about the sound of a refrigerator. The sensor pauses the cycle if it senses a cat is still inside, preventing any surprise motion. If your cat seems hesitant, try a low‑profile model and place the box in a quiet corner; most felines accept the gentle whir within a day or two.
Clumping clay litter is the safest bet because the rake can easily separate the solid clumps. Some units are designed for crystal litter, but you’ll need to verify compatibility in the specs. If you prefer an eco‑friendly option, look for a model that lists “silica‑gel‑compatible” or “natural wood pellets” – just remember that non‑clumping litters can jam the mechanism.
For a single‑cat household, the drawer typically fills up once a week. Multi‑cat homes may need to empty it every three to four days. A good habit is to set a weekly reminder on your phone; when the drawer is half full you’ll notice the weight and can swap it out before it gets too heavy, keeping the motor running smoothly.
Make sure the drawer is seated flat; any wobble can cause the motor to stall. Check for litter debris on the rails and give them a quick wipe. If it’s still stuck, a gentle tap on the side often releases the latch. Keeping a spare drawer handy means you can swap it out without waiting for a replacement.
Many newer models include a companion app that notifies you when the waste drawer is full, when the filter needs changing, or even tracks usage patterns. If you’re a tech‑savvy pet parent, these alerts can help you stay ahead of maintenance. Just remember to keep the app updated so you don’t miss critical firmware fixes.
Aside from the weekly empty‑and‑clean routine, replace the carbon filter every 30‑45 days to keep odor at bay. A monthly rinse of the litter pan with warm water and mild soap removes residue that can interfere with the sensor. Finally, inspect the gear mechanism by turning the waste drawer by hand; any gritty feeling means it’s time for a quick lubrication with a silicone‑based spray.
Think of the box as buying back time. If you spend five minutes scooping daily, that’s roughly 30 hours a year. Assigning a modest $10 per hour value, you’re looking at $300 in “time savings” alone. Add reduced litter costs and better odor control, and most cat owners find the pay‑back period falls under two years, especially in multi‑cat homes.


Leave a comment